


What Size Nails to Use for Cedar Siding

What size nails to use for cedar siding depends on thickness, from 2 inches to 3 inches long. The Western Red Cedar Lumber Association (WRCLA) lists a 2 inch (6d) nail for thin bevel siding. The WRCLA also lists a 3 inch (10d) nail for 7/8 inch bevel siding. Use stainless or hot-dipped galvanized nails that reach at least 1-1/4 inches into solid wood.
Key Takeaways
- Nail length runs from 2 inches for thin bevel siding to 3 inches for 7/8 inch bevel and 3/4 inch battens.
- Nails must penetrate at least 1-1/4 inches into studs, furring strips, or blocking.
- Type 304 stainless steel suits general siding, and Type 316 suits seacoast exposure.
- Ring or spiral shanks hold better, and smooth shanks need about 1/4 inch more length.
- Boards up to 6 inches wide can be blind nailed, and wider boards take face nails.
- Each board gets its own nail, and no nail passes through two overlapping boards.
What Size Nails to Use for Cedar Siding
Use a 2 to 3 inch siding nail, matched to thickness. The WRCLA publishes minimum lengths for each profile in its Real Cedar installation guide. A 5/8 inch bevel board takes a 2 inch nail, while 7/8 inch bevel takes a 3 inch nail.
Homeowners who hire cedar siding installers get the length matched to the board before the first course goes up. Nail length covers three layers: the siding, any sheathing or foam behind it, and the wood that holds the nail. Length reads clearly by profile, so the next section lists each one.
What Length Nails for Cedar Siding by Profile
Nail length climbs with siding thickness, from 2 inches to 3 inches. Real Cedar lists 2 inches for bevel up to 5/8 inch thick and 2-1/4 inches for 3/4 inch bevel. Boards, tongue and groove, and channel siding take 2 inches at 5/8 and 3/4 inch thick.
The table below shows length by profile, the smooth shank length, and where the nail goes.
| Profile and thickness | Ring or spiral shank | Smooth shank | Where the nail goes |
|---|---|---|---|
| Bevel, 1/2 and 5/8 in | 2 in (6d) | 2-1/4 in (7d) | Face nail just above the overlap |
| Bevel, 3/4 in | 2-1/4 in (7d) | 2-1/2 in (8d) | Face nail just above the overlap |
| Bevel, 7/8 in and thicker | 3 in (10d) | 3 in (10d) | Face nail just above the overlap |
| Tongue and groove, 5/8 and 3/4 in | 2 in (6d) | 2-1/4 in (7d) | Blind nail through the tongue up to 6 in wide |
| Tongue and groove, 7/8 in | 2-1/4 in (7d) | 2-1/2 in (8d) | Blind nail through the tongue up to 6 in wide |
| Battens, 3/4 in | 3 in (10d) | 3-1/4 in (12d) | One nail between the edges of the boards below |
Real Cedar publishes the minimum lengths, and Bear Creek Lumber lists the smooth shank lengths that run longer. Ring shanks grip the wood, which is why they can be shorter. The graphic below charts the same lengths by thickness.
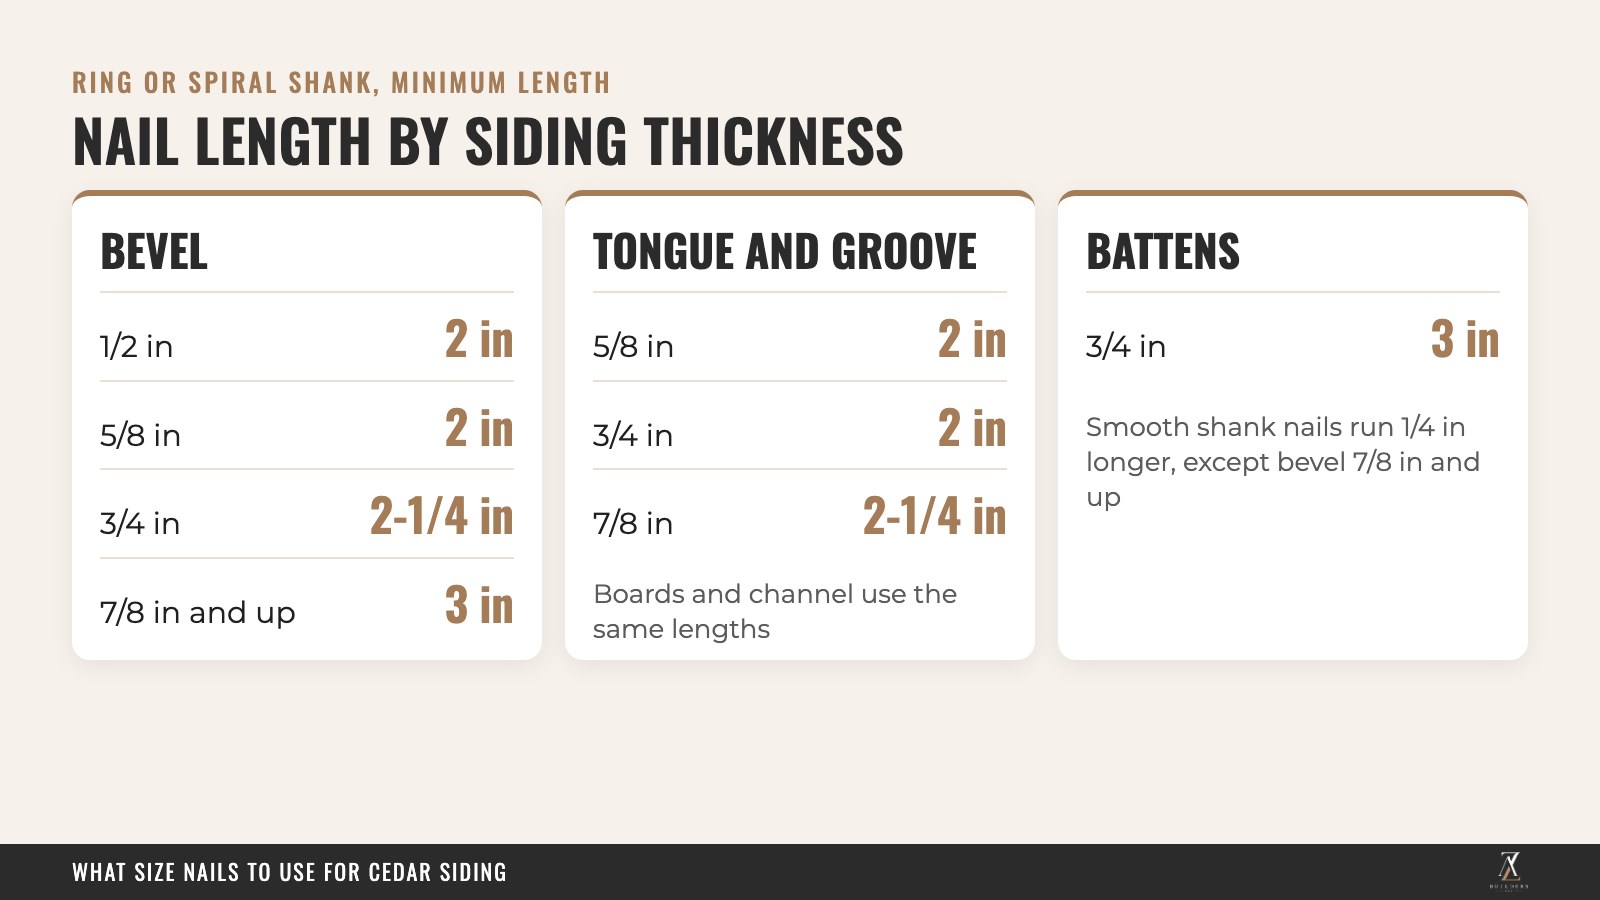
Length alone does not finish the job. Penetration into the framing is the second half of the nail size question for cedar.
How Deep Should Siding Nails Go Into the Studs
Siding nails should penetrate at least 1-1/4 inches into solid wood. Real Cedar sets that depth for studs, furring strips, and blocking. Bear Creek Lumber asks for 1-1/2 inches with smooth shanks and 1-1/4 inches with ring or spiral shanks.
Good practice is to choose a nail long enough to pass through the siding, the sheathing, and any insulation first. Masonry walls need furring strips thick enough for 1-1/2 inches of nail penetration. Foam behind the siding changes the count, as the next section shows.
What Nails to Use With Cedar Siding Over Foam Sheathing
Siding over foam needs nails 2-1/4 inches to 3 inches long. Real Cedar adds foam thickness to the nail length. The table below shows its minimums for 1/2 inch siding and for 5/8 or 3/4 inch siding.
| Siding thickness | Foam thickness | Nail length |
|---|---|---|
| 1/2 in | 1/2 in | 2-1/4 in |
| 1/2 in | 3/4 in | 2-1/2 in |
| 1/2 in | 1 in | 3 in |
| 5/8 or 3/4 in | 1/2 in | 2-1/2 in |
| 5/8 or 3/4 in | 1 in | 3 in |
Real Cedar also warns that rigid foam has little or no nail holding power. Nails must still reach the framing behind the foam. Material is the next choice after length.
What Kind of Nails to Use for Cedar Siding
Use stainless steel, hot-dipped galvanized, or aluminum nails. Real Cedar names all three as corrosion-resistant choices for Western Red Cedar. The same guide says other nail types can rust, disintegrate, and react with the natural oils in the wood.
Anyone asking what nails to use for cedar siding should start with that reaction. Cedar contains tannins and oils that react with some metals. Capital Forest Products notes that this reaction corrodes nails and stains the wood. The result is black streaks running down from each nail head, so the nail type matters for looks as well as strength.

The graphic above sorts the nail materials by how Real Cedar rates them. Within the approved group, one material earns a stronger endorsement.
Is Stainless Steel Better Than Galvanized for Cedar Siding
Stainless steel is the favored choice. Real Cedar says stainless suits siding finished with a transparent stain. Shoppers weighing what nails for cedar siding to buy can narrow the field there. Type 304 stainless suits general siding work. Type 316 suits seacoast exposure.
Hot-dipped galvanized nails are acceptable, because the zinc coat is applied by dipping the nail in molten zinc. Electro-galvanized and bright steel nails fall outside the approved list. Copper nails also react with cedar and should not be used.
A corrosion-resistant nail keeps its hold as the boards age. The cedar siding lifespan guide covers how long the boards themselves hold up. The next choice is the shape of the shank.
Should Cedar Siding Nails Have Ring Shanks
Yes, ring or spiral shanks give cedar siding more holding power. Real Cedar recommends threaded shanks for greater grip. A ring shank also allows the shorter lengths in the table above.
Real Cedar also recommends splitless siding nails, which have thin shanks and blunt points to reduce splitting. Textured heads reduce glossy spots when the siding is finished. Buyers who ask what kind of nails for cedar siding should look for those features.
Pre-drilling adds protection near the ends of boards. Real Cedar says nail holes may need to be pre-drilled at mitered corners, near edges, and near ends. Placement is the next question after the nail itself.
Where Do You Nail Bevel Cedar Siding
Nail bevel siding just above the overlap, one nail per board. Real Cedar says to face nail bevel siding to studs with 1-1/4 inches of penetration. Spacing stays at 24 inches on center maximum.
The nail must not pass through two boards at once. Real Cedar warns against nailing through the overlap of two pieces. Each board then moves on its own as the moisture content of the air changes.
Overlap sets the nail zone. Real Cedar calls for at least 1 inch of overlap on 4 inch and 6 inch boards. Our guide on how to install cedar siding covers the full course sequence. The nail rule applies at every course.
Do You Face Nail or Blind Nail Cedar Siding
Blind nail boards up to 6 inches wide and face nail wider boards. Real Cedar lists that 6 inch cutoff for tongue and groove siding. Blind nailing places one siding nail through the base of each tongue at every bearing.
Wider tongue and groove siding takes two face nails per piece. Nails still need 1-1/4 inches of penetration into solid wood. The same 6 inch line applies to vertical siding.

The graphic above shows where the nail sits for each profile. Board and batten works differently, so it needs its own rule.
How Do You Nail Tongue and Groove Cedar Siding
Blind nail boards up to 6 inches wide, one nail per bearing. Real Cedar says to toe-nail through the base of each tongue. In horizontal work, start at the bottom with the groove edges facing down.
Vertical tongue and groove starts at one corner with the grooved edge toward the adjacent wall. A level or plumb line keeps the first board straight. Nails then go into horizontal blocking or furring strips between the studs.
Real Cedar notes that the first grooved edge may need trimming for a flush fit. Boards wider than 6 inches take two face nails per piece. Overlap rules for bevel boards come next.
How Do You Nail Board and Batten Cedar Siding
Use one nail per bearing through boards up to 6 inches wide. Real Cedar puts that nail through the center of the board. Boards 8 inches and wider take two nails per bearing, 2-1/2 to 3 inches apart.
The batten covers the gap between boards and takes one nail per bearing. The shank passes between the edges of the boards below. Follow these steps for each bay:
- Fasten the first board with one nail per bearing through its center.
- Set the next board and fasten it the same way.
- Center a batten over the gap between the two boards.
- Drive one batten nail per bearing between the board edges.
- Repeat across the wall, keeping every nail in solid wood.
Those bearings need solid wood behind them. Spacing between nails is the last placement rule to set.
How Much Should Cedar Bevel Siding Overlap
Bevel siding overlaps at least 1 inch, and wider boards overlap more. Real Cedar says each course overlaps the upper edge of the course below by a minimum of 1 inch. Rabbeted patterns are self-spacing and leave 1/8 inch for expansion.
- 4 inch and 6 inch boards: 1 inch overlap.
- 8 inch boards: 1 to 1-1/8 inches.
- 10 inch boards: 1 to 1-1/2 inches.
- 12 inch boards: 1 to 2 inches.
Real Cedar says not to reduce those overlaps, because wind-driven water can damage the wall. Larger overlaps suit unseasoned siding that shrinks, and nails must not be over-driven there. Nailing mistakes get their own section next.
What Happens If You Use the Wrong Nails on Cedar Siding
Wrong nails leave rust streaks and stains. Real Cedar says non-approved nails can rust and disintegrate. They also react with the natural preservative oils in the wood.
Bear Creek Lumber shows a project where Alaskan Yellow Cedar siding was installed with regular nails. Even though the boards were blind nailed, black corrosion streaks ran throughout the wall. Bear Creek says Western Red Cedar should be expected to streak the same way.
Heavy nailing causes a second set of problems. Real Cedar warns that it distorts the wood and may cause splitting. Nailing two overlapping pieces together restricts their movement and also splits boards.
- Wrong material: black or gray streaks below each nail head.
- Nail through the overlap: splitting, because each board needs room to move.
- Over-driven head: crushed fibers around the nail.
- Short nail: weak hold in the framing.
Choosing the right nail before the first course avoids those problems. Spacing is the last rule to set.
How Far Apart Should Siding Nails Be
Space cedar siding nails at 24 inches on center maximum. Real Cedar applies that limit over solid wood-based sheathing. Without sheathing, nails go into studs at 16 inches on center.
Vertical siding follows blocking lines instead of studs. Over wood-based sheathing, blocking can run 36 inches on center when face nailed or 32 inches when blind nailed. Without sheathing, blocking runs 24 inches on center.
- Horizontal siding over solid sheathing: 24 inches on center maximum.
- Horizontal siding without sheathing: 16 inches on center.
- Vertical siding face nailed over sheathing: 36 inches on center.
- Vertical siding blind nailed over sheathing: 32 inches on center.
- Vertical siding without sheathing: 24 inches on center.
Local code can set tighter limits, so check with the building department. Shingles and shakes follow different fastener rules, as the next section explains.
What Nails for Cedar Shingles and Shakes
Use two Type 316 stainless nails per shingle within 15 miles of salt water. The Cedar Shake and Shingle Bureau (CSSB) requires that grade near salt water, according to Capital Forest Products. Elsewhere, Type 304 stainless, Type 316 stainless, or hot-dipped galvanized nails are accepted.
Maze Nails sells Type 316 ring shank shingle nails from 1-1/4 inches to 2 inches long. The company says the grade is mandatory for pressure-impregnated or fire-retardant treated shingles. Shingle panels differ: Real Cedar says to drive nails flush and penetrate studs at least 1/2 inch.
Capital Forest Products suggests that shingle nails extend 3/4 inch to 1 inch into the substrate. Treated shingles need a check with the treater for fastener requirements. Tools come next, since a nailer sets the depth.
Can You Use a Nail Gun on Cedar Siding
Yes, a pneumatic nailer works when depth is set so heads sit flush. Real Cedar warns that heavy nailing distorts the wood and may cause splitting. Capital Forest Products adds that over-driven nails damage cedar, while under-driven nails leave the board loose.
Test the air pressure on scrap cedar before the first course. Check that the gun's nails match the material rules above. Collated nails still need to be stainless, hot-dipped galvanized, or aluminum.
What Else Should You Know About Nails
Can Roofing Nails Fasten Cedar Siding
Yes, when they are stainless or hot-dipped galvanized. Real Cedar says other nail types are not recommended. Length matters too, since siding nails must reach 1-1/4 inches into solid wood. A wrong nail can leave stains, and wood siding repairs may start with pulling the bad nails.
Do You Nail or Screw Wood Siding
Nails are the fastener that Real Cedar's installation guide specifies. The guide does not give screw sizes for cedar siding. Follow the siding manufacturer's fastener instructions if a screw is part of the plan.
Do Siding Nails Have to Hit Studs
Yes, siding nails must reach solid wood, such as studs, furring strips, or blocking. Real Cedar says cedar siding should be nailed securely to those members. Sheathing alone does not provide the 1-1/4 inch penetration.
Do the Same Nail Rules Apply to Other Siding
No, other siding materials follow their own manufacturers' fastener rules. The LP SmartSide comparison covers engineered wood against fiber cement. Cedar nail sizes do not carry over to those boards.
How Much Does Redoing Siding Cost
Siding cost depends on material, wall size, and labor. Local prices vary. Our guide on replacement pricing gives national ranges for common materials.
Wall size and labor add to the material cost. Whole-house projects also add disposal, trim work, and new fasteners. The page on the reside cost of a house adds a second set of ranges.
Can You Fix Loose Nails Without Replacing Siding
Yes, a loose or stained nail can be corrected without replacing the board. Pulling the nail and setting a stainless one removes the streak source. Our overview of siding patch repairs shows when a board can stay.
Frequently Asked Questions
What Size Nails for Cedar Clapboard Siding
Clapboard is bevel siding and takes 2 to 3 inch nails. Use 2 inch ring shank nails for 1/2 and 5/8 inch boards. Use 2-1/4 inch nails for 3/4 inch boards and 3 inch nails for 7/8 inch boards and thicker. Smooth shanks run 1/4 inch longer, except at 3 inches.
What Nails Do You Use for Cedar Siding Near Salt Water
Use Type 316 stainless steel nails for seacoast exposure. Real Cedar calls for Type 316 in those locations. Type 304 stainless suits general siding applications.
Should You Countersink Nails in Cedar Siding
No, drive nails flush with the surface instead of sinking them. Over-driven nails damage the wood fibers and weaken the hold. Real Cedar notes that heavy nailing distorts the board.
What Type of Nails for Cedar Siding With a Clear Finish
Use stainless steel nails under a transparent stain. Real Cedar names stainless steel as the choice for that finish. Plain steel nails can rust and streak the wood, as the guide warns.
How Does AZ Builders Fasten Cedar Siding
Our crew follows the manufacturer's nail size, shank, and material for each profile. We check the framing first, so nails land in solid wood. The answer to what size nails to use for cedar siding starts there. Homeowners can reach a wood siding crew through the siding page before choosing a profile.
On every wall, we match nail length to siding thickness and sheathing. We drive each nail into a stud, furring strip, or block. We keep nails flush and clear of the board overlap. Each board then moves freely as moisture changes.
Repairs and full replacements follow the same lengths and spacing. Our siding installers apply them to each new wall.
Spacing, material, and penetration all come from the guides cited above, and the checks happen before the first course goes up. Contact AZ Builders family to talk through a cedar siding project and its fasteners.


You May Also Like


How to Get Homeowners Insurance to Pay for a Bathroom Remodel
Homeowners insurance pays to repair sudden, accidental bathroom damage, not planned upgrades. Learn the 8 claim steps and what policies usually exclude.


How to Build a Louvered Pergola Roof
Build a louvered pergola roof in six steps, from drainage planning to a water test. Compare wood and aluminum louvers, motors, slope, and wind ratings.

How Much Is Metal Siding per Square Foot
Metal siding costs about $8.82 to $14.67 per square foot installed. See 2026 prices by metal type, house size totals, and a comparison with vinyl, fiber cement, and cedar.


