
.webp)


Where to Put Microwave in Kitchen Remodel
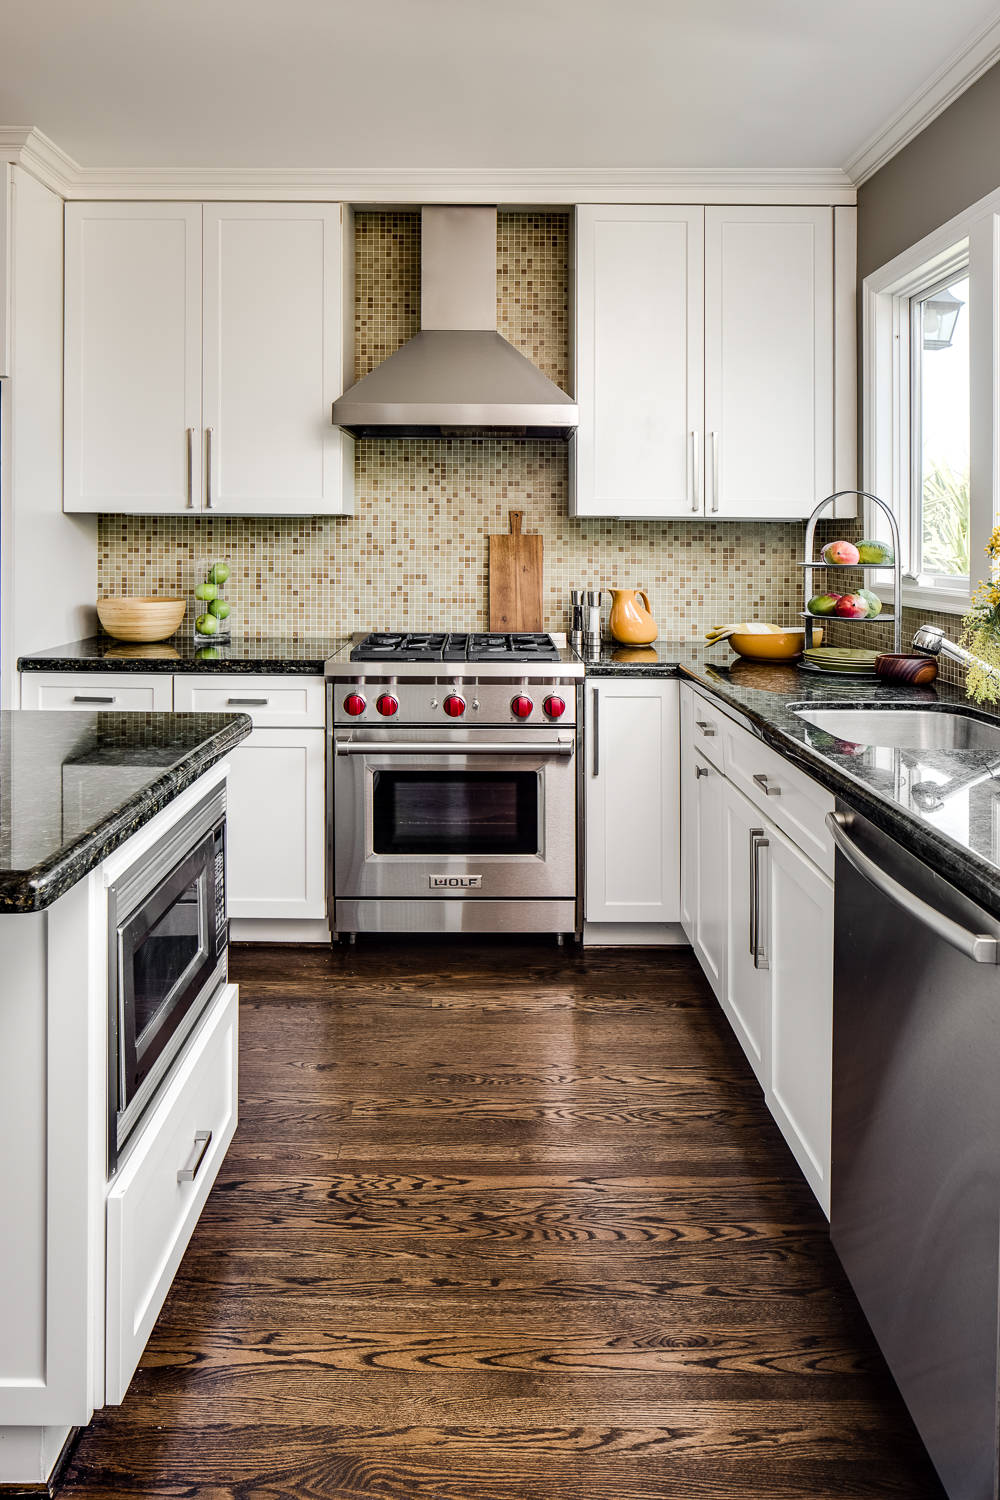
The best places to put a microwave in a kitchen remodel are in a lower base cabinet as a microwave drawer, hidden inside a deep cabinet or appliance garage, or paired with a wall oven as a combination unit. All three options clear valuable counter space and give the kitchen a cleaner, more intentional look. Over-the-range placement and countertop placement are also common, but they rank lower for both ergonomics and design impact in a modern kitchen remodel.
Microwave placement is one of the most overlooked decisions in a kitchen remodel, and it is also one of the decisions homeowners notice the most once they start using the space every day. Where the microwave goes affects counter space, workflow between the stove and the refrigerator, visual clutter, and how comfortable the kitchen feels during daily use. We plan microwave placement on every full home remodel because getting it right during construction costs almost nothing extra, while moving it later means tearing into finished cabinets and walls.
Where to Put a Microwave in a Kitchen Remodel: Top Placement Options
The best microwave placement for a kitchen remodel depends on the layout of the room, how often the microwave gets used, and whether the homeowner wants the appliance visible or hidden. The options below are ranked from the most ergonomic and design-forward placements to the most basic, based on what we see work best on real kitchen remodel projects.
Microwave Drawer in a Base Cabinet
A microwave drawer installed in a lower base cabinet or kitchen island is the most ergonomic microwave placement available in a kitchen remodel. The drawer pulls out horizontally at waist height, which eliminates bending to lift heavy dishes out of a low cabinet and eliminates reaching overhead to pull hot food down from above the range. Microwave drawers keep the appliance completely out of sight when closed, producing a clean cabinet line with no visible appliance breaking the visual flow of the kitchen.
Microwave drawers work especially well in kitchen islands and peninsulas because they keep the microwave accessible from the main cooking zone without using any upper wall cabinet space. Homeowners who invest in a kitchen island during their remodel often extend the project to include outdoor living spaces connected to the kitchen, which makes the island microwave drawer even more practical as a central hub between indoor and outdoor entertaining areas. Families with children also benefit from the lower position because kids can safely reach the drawer without climbing or stretching. The National Kitchen and Bath Association (NKBA) recommends placing microwaves at a height between 24 and 48 inches above the floor for the best combination of safety and accessibility, and a base cabinet drawer fits that range naturally.
The trade-off is cost. Microwave drawers run $1,000 to $2,000 or more for the appliance alone, which is significantly more than a standard countertop or over-the-range unit, according to appliance pricing data from KitchenAid and Consumer Reports. The cabinet opening also needs to be sized precisely during the remodel planning phase, so this placement works best when it is designed into the project from the start rather than added after cabinets are already ordered.
Built-In Cabinet or Appliance Garage
A built-in cabinet microwave placement conceals the appliance behind cabinet doors or inside a dedicated appliance garage. The microwave sits on a shelf inside a deep upper cabinet, a full-height pantry tower, or a countertop-level appliance garage with a retractable door. When the door is closed, the microwave disappears completely, giving the kitchen a streamlined, furniture-like appearance that homeowners investing in a high-end remodel typically want.
Appliance garages are particularly popular in transitional and modern kitchen designs where minimizing visible appliances is a design priority. A built-in trim kit surrounds the microwave inside the cabinet opening, creating a flush, factory-finished look that reads as intentional rather than improvised. Ventilation is the key consideration for any enclosed microwave placement. Built-in microwaves require airflow clearance on the sides, top, and back of the unit to prevent overheating, and the cabinet must include a dedicated 120-volt electrical outlet inside.
We plan ventilation clearances and electrical rough-in for built-in microwave placements during the framing stage of every kitchen renovation we handle. Adding these details during construction is simple and inexpensive. Retrofitting them into finished cabinets after the remodel is complete is harder, more disruptive, and more costly.
Wall Oven and Microwave Combination
A wall oven and microwave combination stacks the microwave above or below a wall oven in a single tall cabinet column. This placement centralizes the two most-used cooking appliances in one location, which streamlines the kitchen workflow and produces a clean, symmetrical look on the wall. The microwave sits at eye level or slightly below, making it easy to see inside and remove hot dishes without reaching overhead or bending down.
Wall oven microwave combos are available as a single combination unit (one appliance with both functions) or as two separate appliances stacked in a custom cabinet column. The single-unit option simplifies installation and produces the tightest visual integration. The stacked two-unit option offers more flexibility in choosing brands and sizes independently. Both options require a dedicated 240-volt circuit for the oven and a 120-volt circuit for the microwave, plus proper structural support in the cabinet because the combined weight of both appliances can exceed 200 pounds.
This placement works best in larger kitchens with enough wall space for a tall appliance column without crowding the work triangle. According to kitchen design surveys from Houzz, wall oven and microwave combinations are among the most requested appliance configurations in kitchen remodels, particularly in homes with open-concept floor plans where the kitchen is visible from the living area.
Over the Range
An over-the-range (OTR) microwave mounts above the cooktop or range and doubles as a ventilation hood. Over-the-range placement is one of the most common microwave positions in American kitchens because it saves counter space and combines two functions, the microwave and the exhaust fan, in a single appliance. According to the U.S. Census Bureau's American Housing Survey, over-the-range microwaves are installed in a significant share of homes built or remodeled since the early 2000s.
The main drawback of over-the-range placement is height. The bottom of the microwave sits 13 to 16 inches above the cooktop surface to meet clearance requirements, which puts the microwave controls and the interior at 66 inches or higher above the floor. For shorter adults and children, reaching overhead to remove a hot bowl or plate from above a hot stove creates both an ergonomic strain and a safety concern. Kitchen designers increasingly recommend moving the microwave out of the over-the-range position in remodels, reserving that space for a dedicated range hood that provides stronger ventilation. A dedicated range hood typically moves 300 to 600 cubic feet per minute (CFM) of air, while most OTR microwaves move 200 to 400 CFM, according to data from the Home Ventilating Institute (HVI).
Over-the-range microwaves still make practical sense in smaller kitchens where wall and base cabinet space is limited and the homeowner needs to maximize every square foot. In those situations, the OTR position is a reasonable compromise between function and space efficiency.
On the Countertop
A countertop microwave sits directly on the counter surface, plugged into a standard wall outlet. Countertop placement is the simplest, cheapest, and most portable option. The microwave requires no special cabinetry, no built-in trim kit, and no dedicated electrical circuit beyond a standard 120-volt outlet. For homeowners on a tight remodel budget, the countertop position keeps the microwave accessible without adding any installation cost to the project.
The trade-off is counter space. A standard countertop microwave occupies 2 to 4 square feet of counter surface, which is significant in a small or galley kitchen where every inch of prep area matters. Countertop microwaves also contribute to visual clutter, and in an open-concept kitchen where the counters are visible from the living or dining area, a microwave sitting on the counter can undercut the clean, finished look the rest of the remodel delivers. For kitchens where counter space is tight, moving the microwave off the counter and into a cabinet, drawer, or wall oven combo is one of the simplest upgrades that makes the biggest daily difference in how the kitchen looks and functions.
What to Consider When Choosing Microwave Placement in a Kitchen Remodel
Choosing the right microwave placement in a kitchen remodel comes down to four practical considerations. Getting these details right during the planning phase prevents the frustration of living with an awkward microwave position for years after the remodel is finished.
- Kitchen workflow: the microwave should sit near the refrigerator or prep zone, inside or adjacent to the work triangle, so you can move food without crossing the room.
- Landing zone: at least 15 inches of counter space immediately next to or below the microwave is the standard recommendation from the NKBA for setting down hot dishes safely.
- Ventilation and power: every microwave needs a dedicated 120-volt, 20-amp circuit and proper airflow clearance on all sides when enclosed in cabinetry.
- Kitchen layout and size: the shape and square footage of the room determines which placements are practical and which ones are not.
Kitchen Workflow and the Work Triangle
The microwave should sit near the refrigerator or the primary prep zone so you can move food from storage to the microwave to the counter without crossing the entire kitchen. Kitchen designers call this the work triangle, the path between the refrigerator, the stove, and the sink. Placing the microwave inside or adjacent to the work triangle keeps it within arm's reach during cooking without forcing extra steps across the room.
For island kitchens, a microwave drawer in the island puts the appliance at the center of the work zone. For galley and L-shaped kitchens, a built-in cabinet placement on the same wall as the refrigerator keeps the microwave in the flow of food prep. For U-shaped kitchens, a wall oven combo on the end wall centralizes the cooking appliances without crowding the main counter runs.
Landing Zone
Every microwave needs a landing zone, a section of counter space immediately next to or below the microwave where you can set down hot dishes safely after removing them from the appliance. The NKBA recommends at least 15 inches of counter landing space adjacent to the microwave location. A microwave placed inside a tall pantry cabinet with no counter nearby forces the user to carry a hot plate or bowl across the kitchen, which creates both a safety issue and a workflow interruption.
Ventilation and Power Requirements
Every microwave requires a dedicated 120-volt, 20-amp electrical circuit. Built-in and drawer microwaves require the outlet to be installed inside the cabinet during the electrical rough-in phase of the remodel. Enclosed microwave placements also require ventilation clearance, typically 1 to 3 inches on the top and sides and open airflow at the back, to prevent the appliance from overheating. Over-the-range microwaves need a vent duct to the exterior or a recirculating charcoal filter for ventless installations.
Planning the electrical and ventilation requirements early in the remodel timeline avoids costly change orders after the drywall and cabinets are already in place. The sequence for getting microwave placement right in a remodel follows a specific order.
- Choose the microwave placement during the kitchen design phase, before cabinets are ordered, so the cabinet opening matches the appliance dimensions exactly.
- Rough in the dedicated 120-volt, 20-amp electrical circuit to the microwave location during the framing and electrical stage.
- Install any vent ductwork or verify ventilation clearances before the drywall goes up.
- Confirm the cabinet dimensions against the microwave specifications when the cabinets arrive on site.
- Install the microwave and trim kit as one of the final steps after countertops and backsplash are in place.
We follow this sequence on every kitchen project so the appliance drops into its final position without modification once the cabinets are installed.
Kitchen Layout and Size
The layout of the kitchen determines which microwave placements are practical and which ones are not. The table below matches common kitchen layouts to the microwave placements that work best in each one.
Kitchen LayoutBest Microwave PlacementWhy It WorksLarge island kitchenMicrowave drawer in islandCenters the microwave in the main work zone without using wall spaceOpen-concept with visible countersBuilt-in cabinet or appliance garageHides the microwave from sight lines between kitchen and living areaU-shaped kitchenWall oven and microwave comboCentralizes cooking appliances on the end wall without crowding countersL-shaped kitchenBuilt-in cabinet near refrigeratorKeeps the microwave in the food prep workflow along the main counter runGalley kitchenOver the range or built-in cabinetMaximizes limited wall and counter space in a narrow layoutSmall kitchen with limited cabinetsOver the range or countertopSaves cabinet space for storage in kitchens with fewer options
The layout drives the decision. A microwave drawer in a kitchen island is one of the best placements available, but it only works if the kitchen has an island. Over-the-range placement is the practical choice for a tight galley kitchen, but it would be a missed opportunity in a large kitchen with ample wall space for a built-in or combo unit. We walk every kitchen during the initial consultation to assess which placements fit the room before the design phase begins.
How Much Does Microwave Placement Cost in a Kitchen Remodel?
Microwave placement cost in a kitchen remodel ranges from $0 extra for a countertop microwave on the existing counter to $2,000 to $4,000 or more for a microwave drawer or built-in cabinet with custom trim, depending on the appliance, the cabinetry modifications, and the electrical work involved. The placement itself is an incremental cost within the larger remodel budget, and choosing the right position during the design phase adds far less cost than retrofitting it after the kitchen is finished.
A countertop microwave adds zero installation cost beyond the price of the appliance. An over-the-range microwave typically adds $150 to $400 for mounting hardware and vent connections. A built-in microwave with a trim kit adds $200 to $600 for the kit and installation, plus any cabinet modifications. A microwave drawer adds the most because the appliance itself costs $1,000 to $2,000 and the cabinet opening must be custom-sized. For homeowners planning a broader remodel, the full picture of remodeling costs helps put these appliance placement decisions into the context of the total project budget. Homeowners building ADU or DADU additions with kitchenettes face the same microwave placement decisions in a smaller footprint, where the choice between countertop and built-in matters even more. Many homeowners also find ways to save money on kitchen remodels by prioritizing the placement decisions that make the biggest daily difference.
Frequently Asked Questions
Should You Put a Microwave Over the Stove?
You should put a microwave over the stove only if counter and cabinet space is too limited to support a better placement. Over-the-stove placement saves space and provides ventilation, but it puts the microwave at an awkward height for shorter users and replaces a dedicated range hood that would provide stronger exhaust airflow. A dedicated range hood moves 300 to 600 CFM, while most over-the-range microwaves move 200 to 400 CFM, according to the Home Ventilating Institute. In a remodel with room for alternatives, moving the microwave off the range and installing a proper hood is the better long-term choice for both safety and air quality.
Can You Put a Microwave in a Kitchen Island?
Yes, you can put a microwave in a kitchen island, and it is one of the best placements available in a remodel. A microwave drawer installed in the island keeps the appliance at waist height, centers it in the main work zone, and frees up all wall and upper cabinet space for storage or design features. The island must have a dedicated 120-volt, 20-amp circuit run to it during the electrical rough-in phase, and the cabinet opening must be sized to the specific drawer model being installed.
Where Should You Not Put a Microwave?
You should not put a microwave in a location with no landing zone (no counter nearby to set hot dishes on), inside an enclosed cabinet with no ventilation clearance, or in a spot that requires carrying hot food across a traffic path in the kitchen. You should also avoid placing a microwave directly adjacent to the refrigerator with no counter buffer between them, because the heat output from the microwave can force the refrigerator compressor to work harder. At least 15 inches of counter space between the microwave and the refrigerator is the standard recommendation from the NKBA.
Is It Better to Have a Built-In Microwave or a Countertop Microwave?
A built-in microwave is better than a countertop microwave for design impact, counter space, and resale value in a kitchen remodel. A countertop microwave is better for budget, simplicity, and portability. Built-in microwaves integrate into the cabinetry with a trim kit for a seamless look, while countertop models sit on the surface and take up 2 to 4 square feet of prep area. In a remodel where the homeowner is already investing in new cabinets and layout changes, the incremental cost of building in the microwave is small relative to the improvement in how the kitchen looks and functions every day.
What Is the Best Height for a Microwave in a Kitchen?
The best height for a microwave in a kitchen is between 24 and 48 inches above the floor, according to the National Kitchen and Bath Association (NKBA). This range puts the microwave controls and interior at a comfortable reach for most adults without requiring bending or overhead stretching. A microwave drawer in a base cabinet hits the lower end of that range. A built-in microwave in an upper cabinet or wall oven column hits the higher end. Over-the-range microwaves typically exceed the recommended range, with controls at 66 inches or higher above the floor.
Does Microwave Placement Affect Kitchen Resale Value?
Yes, microwave placement affects kitchen resale value because buyers notice built-in, intentional appliance integration as a sign of a well-planned remodel. A microwave drawer, a wall oven combo, or a clean built-in cabinet placement signals quality and attention to detail that buyers associate with higher-end kitchens. A countertop microwave sitting on the counter in an otherwise renovated kitchen reads as an unfinished detail. According to the 2024 National Association of Realtors (NAR) Remodeling Impact Report, kitchen remodels consistently rank among the highest-return home improvement projects, and the quality of appliance integration is one factor that separates a kitchen that impresses buyers from one that does not. Exterior upgrades like professional siding installation paired with a well-planned kitchen remodel produce the strongest combined resale impact.
The Takeaway
The best place to put a microwave in a kitchen remodel is inside the cabinetry, not on the counter. A microwave drawer in a base cabinet or island is the most ergonomic option. A built-in cabinet or appliance garage hides the appliance completely for a clean, streamlined look. A wall oven combination centralizes cooking appliances in one location. Over-the-range placement saves space in smaller kitchens but sacrifices ergonomics and ventilation performance. Countertop placement is the simplest option but uses valuable prep space and contributes to visual clutter.
Planning microwave placement during the design phase of the remodel, not after the cabinets are ordered, is the key to getting it right. The electrical circuit, ventilation clearance, and cabinet opening all need to be in place before the walls close up. We plan these details on every kitchen project because a well-placed microwave is one of those small decisions that makes the kitchen feel right every single day.
If you are planning a kitchen remodel and want help thinking through the layout, appliance placement, and design, AZ Builders LLC handles kitchen projects from initial consultation through final walkthrough across Central Washington. Reach our team at (509) 661-2919 to talk through your project.
.webp)

.webp)
.webp)
You May Also Like

.webp)

%201.webp)
%202.webp)
%203.webp)
.webp)


.avif)